Generate OG images on the edge with Netlify

Kevin Zuniga Cuellar @kevinzunigacuel

In October 2022, Vercel open sourced Satori, a new library that enables React users to generate SVGs on the edge. This release unlocked the potential for faster generation of customizable images.
In this guide, we will use og-edge, a forked version of Satori ported to Deno by Matt Kane, to generate open graph images on the edge with Netlify in your Astro project.
Getting started
-
Create a new Astro project using the CLI:
Terminal window npm create astro@latest -
Install the Netlify CLI globally on your machine to run Netlify edge functions locally during development:
Terminal window npm install -g netlify-cli -
In the root of your project, create a new directory called
netlify/edge_functions. -
Inside the
edge_functionsfolder, create a new file calledog.tsx. -
Finally, create a new file called
netlify.tomlin the root of your project and add the following configuration:netlify.toml [[edge_functions]]function = "og"path = "/og-image"This configuration file declares a new edge function named
ogand replaces the default Netlify edge function path from/.netlify/edge_functions/og-imageto/og-image.
Creating an og image generator
To generate open graph images, we will utilize the query parameters on the request object to populate the image with dynamic content.
In the following example, we retrieve the title and pubDate query parameters from the request.
export default async function handler(req: Request) { const url = new URL(req.url); const params = new URLSearchParams(url.search); const title = params.get("title") ?? "Created with Netlify edge functions"; const pubDate = params.get("pubDate") ?? new Date().toISOString();}Next, import the ImageResponse function from og-edge and React from react.
import React from "https://esm.sh/react@18.2.0";import { ImageResponse } from "https://deno.land/x/og_edge@0.0.2/mod.ts";
export default async function handler(req: Request) {  const url = new URL(req.url);  const params = new URLSearchParams(url.search);  const title = params.get("title") ?? "Created with Netlify edge functions";  const pubDate = params.get("pubDate") ?? new Date().toISOString();}
Finally, use the ImageResponse function to generate the open graph image and return it as a response.
import React from "https://esm.sh/react@18.2.0";import { ImageResponse } from "https://deno.land/x/og_edge@0.0.2/mod.ts";
export default function handler(req: Request) { const url = new URL(req.url); const params = new URLSearchParams(url.search); const title = params.get("title") ?? "Created with Netlify edge functions"; const pubDate = params.get("pubDate") ?? new Date().toISOString();
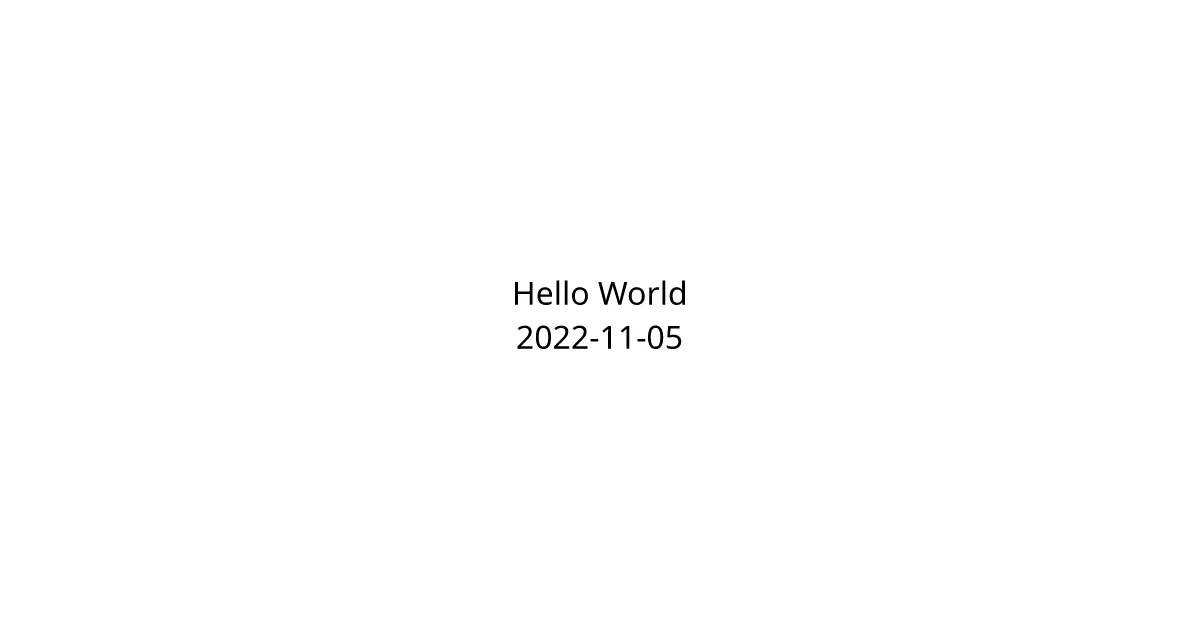
return new ImageResponse( ( <div style={{ height: "100%", width: "100%", display: "flex", flexDirection: "column", alignItems: "center", justifyContent: "center", backgroundColor: "#fff", fontSize: 32, }} > <div>{title}</div> <div>{pubDate}</div> </div> ), );}Testing an edge function locally
To test your edge function locally, run the following command in the root of your project:
netlify devThis will start a local development server on localhost:8888.
To test the edge function, navigate to localhost:8888/og-image?title=Hello%20World&pubDate=2022-11-05 in your browser. You should see a blank example of an og image.
Customization possibilities
You have the freedom to customize the image as desired. Feel free to add more query parameters, modify the styling, or add additional elements.
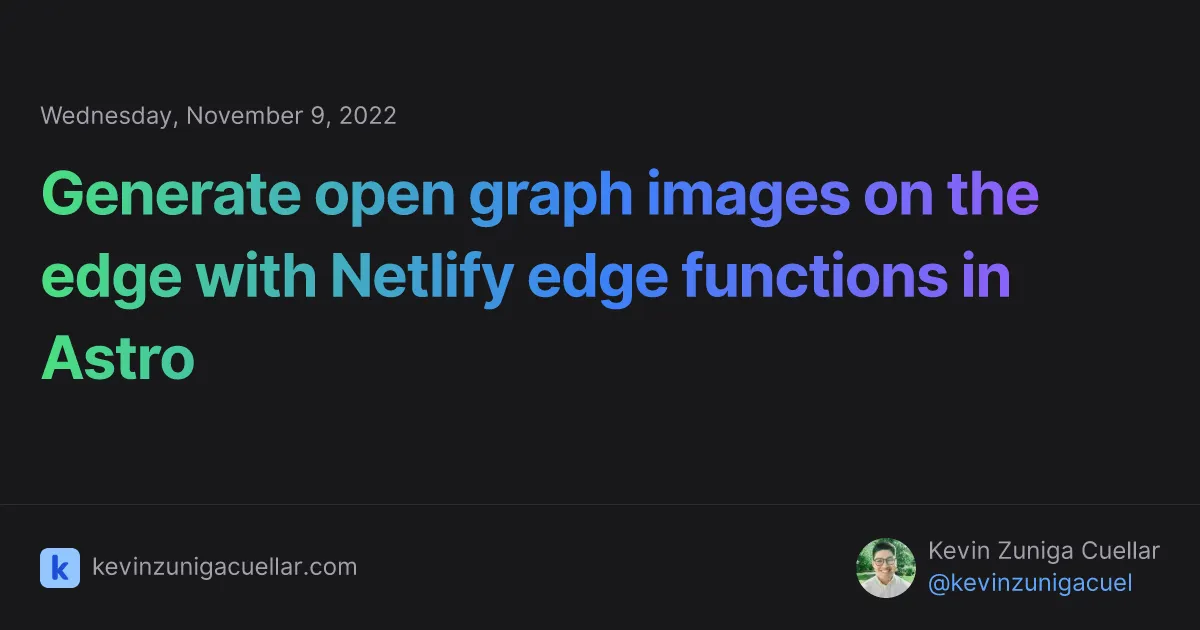
For inspiration, here is the open graph image generated for this post.